> ## Documentation Index
> Fetch the complete documentation index at: https://docs-dev-privilege-worker-scope-pinning.mintlify.site/llms.txt
> Use this file to discover all available pages before exploring further.
> Grant an application access to Token Vault so it can exchange a JWT bearer token for an access token to call external APIs.
# Privileged Worker Token Exchange with Token Vault
export const ReleaseStageNotice = ({feature, stage, plans, contact, terms}) => {
const stageTextMap = {
"beta": "Beta",
"ea": "Early Access"
};
const stageText = stageTextMap[stage] || "a product release stage";
const prsLink = "/docs/troubleshoot/product-lifecycle/product-release-stages";
const linkify = (text, url) => {
return {text};
};
const includeDetails = (plans, contact, terms) => {
const hasDetails = terms || plans || contact;
if (!hasDetails) return null;
return
{plans && <>This feature is available for {linkify(`${plans} plans`, "https://auth0.com/pricing")}. }
{contact && "To participate, contact " + contact + ". "}
{terms && <>By using this feature, you agree to the applicable Free Trial terms in Okta's {linkify("Master Subscription Agreement", "https://www.okta.com/legal")}.}
;
};
return
The {feature} feature is in {linkify(stageText, prsLink)}.
{includeDetails(plans, contact, terms)}
;
};
Token Vault supports the Privileged Worker Token Exchange, which enables a client application to exchange a signed JWT (subject token) for an external provider’s access token (requested token).
After successful user authentication and authorization, a client application typically passes the user context, which contains the user's identity, permissions, and session state, as an access or refresh token to perform the token exchange with Token Vault. In service-to-service flows, a client application, such as a backend application or service worker, may need to access resources on the user’s behalf, but because the “user is not present” in an interactive session, the client application doesn’t have access to the user context.
In these service-to-service scenarios, the client application can generate a signed JWT bearer token and use it as the subject token to perform the token exchange and receive the necessary tokens to call external APIs. This means the client application can perform actions on the user’s behalf without an active user interaction or session.
To use the Privileged Worker Token Exchange with Token Vault, the client application must be a highly privileged client that can request access tokens from external providers via Token Vault. It should authenticate with Token Vault using asymmetric cryptographic methods such as [Private Key JWT](/docs/get-started/authentication-and-authorization-flow/authenticate-with-private-key-jwt) assertion or [mutual TLS authentication](/docs/get-started/authentication-and-authorization-flow/authenticate-with-mtls).
## Prerequisites
Only certain types of clients can use the Privileged Worker Token Exchange with Token Vault:
* The client must be a first-party client, i.e. the `is_first_party property` is `true`.
* The client must be a confidential client with a valid authentication mechanism, i.e. the `token_endpoint_auth_method` property must not be set to `none`.
* The client must be OIDC conformant, i.e. the `oidc_conformant` must be `true`.
Before configuring Privileged Worker Token Exchange for your client application:
1. [Enable the Token Vault grant type](/docs/secure/tokens/token-vault/configure-token-vault#configure-application) for your client application.
2. Configure [Private Key JWT](/docs/get-started/authentication-and-authorization-flow/authenticate-with-private-key-jwt) or [mutual TLS authentication](/docs/get-started/authentication-and-authorization-flow/authenticate-with-mtls) for your client application.
## Configure client application
To configure the client application's privileged access to Token Vault, you must:
* Provide a public key, which is used to verify a signed JWT as the subject token.
* Restrict which IP addresses the client may make requests from.
* Pin the client to the connections and scopes it's allowed to request.
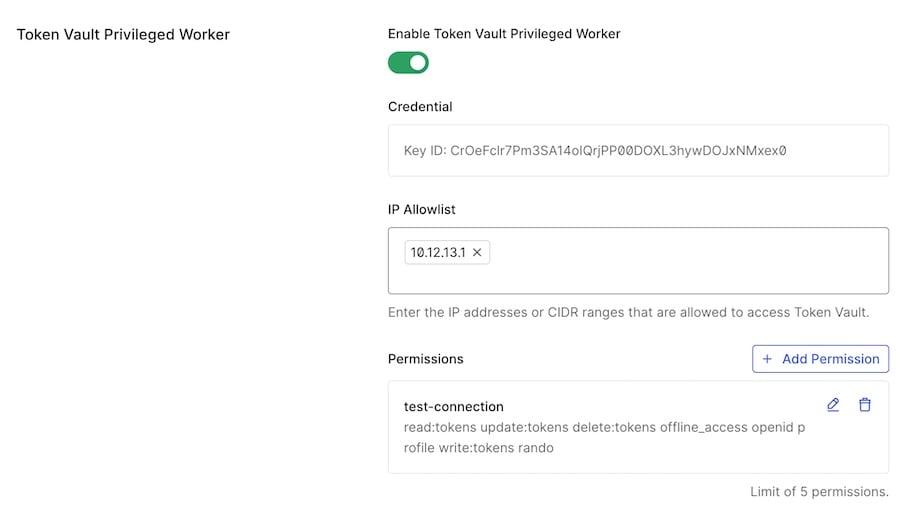
1. Navigate to **Applications > Applications** and select your application.
2. Select the **Settings** tab, scroll to the **Privileged Worker** section, and toggle on **Enable Privileged Worker**. In the modal, select an existing public key credential or upload a new one, then select **Save**.
3. Once the credential is saved, enter at least one IP address or CIDR range in the **IP Allowlist** field.
4. Under **Permissions**, select **Add Permission**. In the window, select a **Connection** and enter the **Scopes** this connection is allowed to request, then select **Save**. Repeat for each connection you want to allow. You can configure up to 5 permissions and 20 scopes in total.
5. Select **Save Changes**.
6. Enable each connection referenced in **Permissions** for this application. Navigate to **Authentication > \[Connection type]**, select the connection, go to the **Applications** tab, and toggle the connection on for your application.
 You can set the Token Vault privileged access public key, IP allowlist, and grants when creating a new client. The public key credential is configured similarly to [configuring JAR](/docs/get-started/applications/configure-jar#configure-jwt-secured-authorization-requests-jar):
```bash lines theme={null}
POST https://{yourDomain}.auth0.com/api/v2/clients
Authorization: Bearer
Content-Type: application/json
{
"name": "My App using Privilege Worker",
"grant_types": [
"urn:auth0:params:oauth:grant-type:token-exchange:federated-connection-access-token"
],
"oidc_conformant": true,
"is_first_party": true,
"jwt_configuration": {
"alg": "RS256"
},
"token_vault_privileged_access": {
"credentials": [
{
"name": "My credential for Token Vault Privileged Access",
"credential_type": "public_key",
"pem": "",
"alg": "RS256"
}
],
"ip_allowlist": [
""
],
"grants": [
{
"connection": "",
"scopes": [""]
}
]
}
}
```
You can also update an existing client with the Token Vault privileged access public key, IP allowlist, and grants:
```bash lines theme={null}
PATCH https://{yourDomain}.auth0.com/api/v2/clients/{yourClientId}
Authorization: Bearer
Content-Type: application/json
{
"token_vault_privileged_access": {
"credentials": [{"id": ""}],
"ip_allowlist": [""],
"grants": [
{
"connection": "",
"scopes": [""]
}
]
}
}
```
The credential `id` is returned in the response when you created your client. If you need to look it up, retrieve it with a GET request:
```bash lines theme={null}
GET https://{yourDomain}.auth0.com/api/v2/clients/{yourClientId}/credentials
Authorization: Bearer
```
For each connection referenced in `grants`, you must also enable the connection for this client:
```bash lines theme={null}
PATCH https://{yourDomain}.auth0.com/api/v2/connections/{yourConnectionId}/clients
Authorization: Bearer
Content-Type: application/json
[
{
"client_id": "",
"status": true
}
]
```
The `ip_allowlist` (**IP Allowlist** in the Dashboard) restricts which IP addresses may make Privileged Worker exchange requests. This binds the client credential to known server egress IPs, so a leaked credential cannot be used from an arbitrary IP address. Both IPv4 and IPv6 addresses and CIDR ranges are supported, with a maximum of 10 entries.
The `grants` (**Permissions** in the Dashboard) pins the client to a specific set of connections and, within each connection, a specific set of scopes. A Privileged Worker token exchange request is rejected if it targets a connection not listed in `grants`. Additionally, requesting a narrower scope than what was granted causes Token Vault to return a token restricted to that narrower scope provided the identity provider supports downscoping, otherwise the request fails rather than silently returning the full granted scope. A maximum of 5 connections and 20 scopes (across all connections combined) can be configured. Note that the listed connection must be enabled for the client, as described above.
`ip_allowlist` and `grants` are not required to save a client's configuration, but both must be populated for the Privileged Worker Token Exchange to work: any request from an IP not in `ip_allowlist`, or for a connection or scope not in `grants`, will be rejected.
## Create signed JWT subject token
After [configuring your client application with the public key](#configure-client-application), you need to create the subject token that will be exchanged for an access token for an external API. The subject token is a JSON Web Token (JWT) with the necessary claims. It is signed with the private key.
The JWT has a standard format and claims:
**Header**
| **Claim** | **Description** |
| --------- | ------------------------------------------------------------------ |
| `typ` | Required. Must be `token-vault-req+jwt`. |
| `kid` | Optional. Only needed if you have multiple public keys configured. |
**Payload**
| **Claim** | **Description** |
| --------------- | --------------------------------------------------------------------------------------------------------------- |
| `sub` | Required. The user ID for whom you want to get the token. |
| `aud` | Required. Your tenant host. |
| `iss` | Required. Your client ID making the request. |
| `iat` | Required. Issued-at timestamp. |
| `exp` | Optional. Expiration timestamp. Tokens older than 60 seconds are rejected regardless. |
| `jti` | Required. A unique identifier for this JWT (UUID v4 recommended) for replay protection. |
| `audit_context` | Required. A human-readable string (1–256 characters) describing the business reason for this privileged access. |
| `org_id` | Optional. The organization ID, if the request is scoped to an organization. |
The following is an example JWT:
```json lines theme={null}
{
alg: "RS256"
typ: "token-vault-req+jwt"
}
.
{
sub: "auth0|000012030101231",
aud: "https://{yourDomain}.auth0.com/",
iss: "",
iat: 1758799540,
exp: 1758800540,
nbf: 1758799540,
jti: "",
audit_context: "",
org_id: ""
}
```
Do not include personally identifiable information (PII) in `audit_context`. This value is recorded in tenant logs and may be visible to administrators and log streaming destinations.
The following code sample is a script that generates a signed JWT subject token:
```tsx lines theme={null}
import * as jwt from 'jsonwebtoken';
const privateKey = ‘-----BEGIN RSA PRIVATE KEY-----........’;
const subjectToken = jwt.sign(
{
iss: CLIENT_ID,
aud: 'https://' + TENANT_DOMAIN + '/',
sub: USER_ID,
jti: uuidv4(),
audit_context: 'Automated nightly sync for compliance report',
// org_id is optional; include it if this request is scoped to an organization
org_id: ORGANIZATION_ID,
},
privateKey,
{
algorithm: 'RS256',
header: {
typ: 'token-vault-req+jwt',
},
}
);
```
## Request token for external API
Once you have the signed JWT, you can make a request for the access token for the external API:
```bash lines theme={null}
curl --request POST 'https://{yourDomain}.auth0.com/oauth/token' \
--header 'Content-Type: application/json' \
--data '{
"client_id": "",
"client_secret": "",
"subject_token": "",
"grant_type": "urn:auth0:params:oauth:grant-type:token-exchange:federated-connection-access-token",
"subject_token_type": "urn:ietf:params:oauth:token-type:jwt",
"requested_token_type": "http://auth0.com/oauth/token-type/token-vault-access-token",
"connection": "google-oauth2"
}'
```
| Parameter | Description |
| ---------------------- | --------------------------------------------------------------------------------------------------------------------------------------------------- |
| `grant_type` | The grant type. For Token Vault, set to `urn:auth0:params:oauth:grant-type:token-exchange:federated-connection-access-token` |
| `client_id` | Client application ID |
| `client_secret` | Client secret. **Note:** For Privileged Worker Token Exchange, we recommend using Private Key JWT or mTLS authentication. |
| `subject_token_type` | Type of subject token. For Privileged Worker Token Exchange, set to JWT: `urn:ietf:params:oauth:token-type:jwt` |
| `subject_token` | The signed JWT bearer token that the Auth0 Authorization Server validates to identify the user. |
| `requested_token_type` | The requested token type. For Privileged Worker Token Exchange, this should always be `http://auth0.com/oauth/token-type/token-vault-access-token`. |
| `connection` | The connection name, in this case, `google-oauth2`. |
You can set the Token Vault privileged access public key, IP allowlist, and grants when creating a new client. The public key credential is configured similarly to [configuring JAR](/docs/get-started/applications/configure-jar#configure-jwt-secured-authorization-requests-jar):
```bash lines theme={null}
POST https://{yourDomain}.auth0.com/api/v2/clients
Authorization: Bearer
Content-Type: application/json
{
"name": "My App using Privilege Worker",
"grant_types": [
"urn:auth0:params:oauth:grant-type:token-exchange:federated-connection-access-token"
],
"oidc_conformant": true,
"is_first_party": true,
"jwt_configuration": {
"alg": "RS256"
},
"token_vault_privileged_access": {
"credentials": [
{
"name": "My credential for Token Vault Privileged Access",
"credential_type": "public_key",
"pem": "",
"alg": "RS256"
}
],
"ip_allowlist": [
""
],
"grants": [
{
"connection": "",
"scopes": [""]
}
]
}
}
```
You can also update an existing client with the Token Vault privileged access public key, IP allowlist, and grants:
```bash lines theme={null}
PATCH https://{yourDomain}.auth0.com/api/v2/clients/{yourClientId}
Authorization: Bearer
Content-Type: application/json
{
"token_vault_privileged_access": {
"credentials": [{"id": ""}],
"ip_allowlist": [""],
"grants": [
{
"connection": "",
"scopes": [""]
}
]
}
}
```
The credential `id` is returned in the response when you created your client. If you need to look it up, retrieve it with a GET request:
```bash lines theme={null}
GET https://{yourDomain}.auth0.com/api/v2/clients/{yourClientId}/credentials
Authorization: Bearer
```
For each connection referenced in `grants`, you must also enable the connection for this client:
```bash lines theme={null}
PATCH https://{yourDomain}.auth0.com/api/v2/connections/{yourConnectionId}/clients
Authorization: Bearer
Content-Type: application/json
[
{
"client_id": "",
"status": true
}
]
```
The `ip_allowlist` (**IP Allowlist** in the Dashboard) restricts which IP addresses may make Privileged Worker exchange requests. This binds the client credential to known server egress IPs, so a leaked credential cannot be used from an arbitrary IP address. Both IPv4 and IPv6 addresses and CIDR ranges are supported, with a maximum of 10 entries.
The `grants` (**Permissions** in the Dashboard) pins the client to a specific set of connections and, within each connection, a specific set of scopes. A Privileged Worker token exchange request is rejected if it targets a connection not listed in `grants`. Additionally, requesting a narrower scope than what was granted causes Token Vault to return a token restricted to that narrower scope provided the identity provider supports downscoping, otherwise the request fails rather than silently returning the full granted scope. A maximum of 5 connections and 20 scopes (across all connections combined) can be configured. Note that the listed connection must be enabled for the client, as described above.
`ip_allowlist` and `grants` are not required to save a client's configuration, but both must be populated for the Privileged Worker Token Exchange to work: any request from an IP not in `ip_allowlist`, or for a connection or scope not in `grants`, will be rejected.
## Create signed JWT subject token
After [configuring your client application with the public key](#configure-client-application), you need to create the subject token that will be exchanged for an access token for an external API. The subject token is a JSON Web Token (JWT) with the necessary claims. It is signed with the private key.
The JWT has a standard format and claims:
**Header**
| **Claim** | **Description** |
| --------- | ------------------------------------------------------------------ |
| `typ` | Required. Must be `token-vault-req+jwt`. |
| `kid` | Optional. Only needed if you have multiple public keys configured. |
**Payload**
| **Claim** | **Description** |
| --------------- | --------------------------------------------------------------------------------------------------------------- |
| `sub` | Required. The user ID for whom you want to get the token. |
| `aud` | Required. Your tenant host. |
| `iss` | Required. Your client ID making the request. |
| `iat` | Required. Issued-at timestamp. |
| `exp` | Optional. Expiration timestamp. Tokens older than 60 seconds are rejected regardless. |
| `jti` | Required. A unique identifier for this JWT (UUID v4 recommended) for replay protection. |
| `audit_context` | Required. A human-readable string (1–256 characters) describing the business reason for this privileged access. |
| `org_id` | Optional. The organization ID, if the request is scoped to an organization. |
The following is an example JWT:
```json lines theme={null}
{
alg: "RS256"
typ: "token-vault-req+jwt"
}
.
{
sub: "auth0|000012030101231",
aud: "https://{yourDomain}.auth0.com/",
iss: "",
iat: 1758799540,
exp: 1758800540,
nbf: 1758799540,
jti: "",
audit_context: "",
org_id: ""
}
```
Do not include personally identifiable information (PII) in `audit_context`. This value is recorded in tenant logs and may be visible to administrators and log streaming destinations.
The following code sample is a script that generates a signed JWT subject token:
```tsx lines theme={null}
import * as jwt from 'jsonwebtoken';
const privateKey = ‘-----BEGIN RSA PRIVATE KEY-----........’;
const subjectToken = jwt.sign(
{
iss: CLIENT_ID,
aud: 'https://' + TENANT_DOMAIN + '/',
sub: USER_ID,
jti: uuidv4(),
audit_context: 'Automated nightly sync for compliance report',
// org_id is optional; include it if this request is scoped to an organization
org_id: ORGANIZATION_ID,
},
privateKey,
{
algorithm: 'RS256',
header: {
typ: 'token-vault-req+jwt',
},
}
);
```
## Request token for external API
Once you have the signed JWT, you can make a request for the access token for the external API:
```bash lines theme={null}
curl --request POST 'https://{yourDomain}.auth0.com/oauth/token' \
--header 'Content-Type: application/json' \
--data '{
"client_id": "",
"client_secret": "",
"subject_token": "",
"grant_type": "urn:auth0:params:oauth:grant-type:token-exchange:federated-connection-access-token",
"subject_token_type": "urn:ietf:params:oauth:token-type:jwt",
"requested_token_type": "http://auth0.com/oauth/token-type/token-vault-access-token",
"connection": "google-oauth2"
}'
```
| Parameter | Description |
| ---------------------- | --------------------------------------------------------------------------------------------------------------------------------------------------- |
| `grant_type` | The grant type. For Token Vault, set to `urn:auth0:params:oauth:grant-type:token-exchange:federated-connection-access-token` |
| `client_id` | Client application ID |
| `client_secret` | Client secret. **Note:** For Privileged Worker Token Exchange, we recommend using Private Key JWT or mTLS authentication. |
| `subject_token_type` | Type of subject token. For Privileged Worker Token Exchange, set to JWT: `urn:ietf:params:oauth:token-type:jwt` |
| `subject_token` | The signed JWT bearer token that the Auth0 Authorization Server validates to identify the user. |
| `requested_token_type` | The requested token type. For Privileged Worker Token Exchange, this should always be `http://auth0.com/oauth/token-type/token-vault-access-token`. |
| `connection` | The connection name, in this case, `google-oauth2`. |